Mastercam FAQs
Below are answers to some of the frequently asked questions that OptiPro’s Mastercam technicians receive. If you can’t find your question or would like additional assistance, please feel free to contact us.
Why did I receive an error message that says, “No License found”?
You’ve just installed Mastercam on your new computer. Upon trying to open Mastercam, you get an error – “No License Found”, which prohibits you from running the software. At start Mastercam is looking for the license either by HASP, NetHASP or Software
- If you are using a HASP, then check your PC or Laptop to see if it is plugged in the USB port, and verify the light is on.
- If you are using a NetHASP (currently being replaced by Software Networkable Licensing) launch the NhaspX.exe, and verify its mode is set to Network
- If you are using a Software License and client users are not able to launch Mastercam, check to verify the client computers are pointing to the IP Address housing the license through Codemeter Web Admin. Follow the steps in How To – Setting Up a Networkable Software License to check these settings
- If setup correctly and still experiencing the issue, check the Server/VM for Firewall permissions blocking Codemeter port 22350: How To – Windows Defender Firewall Blocking22350
- If the license still cannot be found contact Mastercam@optipro.com & include a CmDust Log
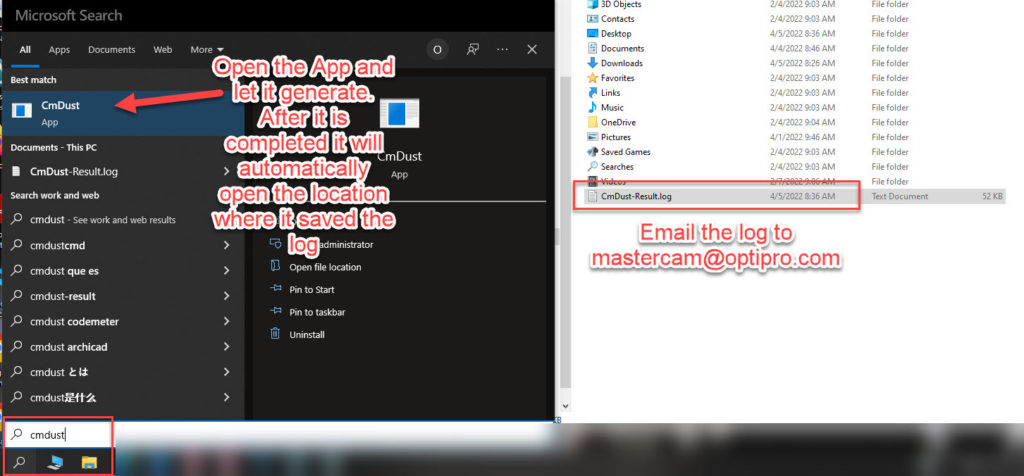
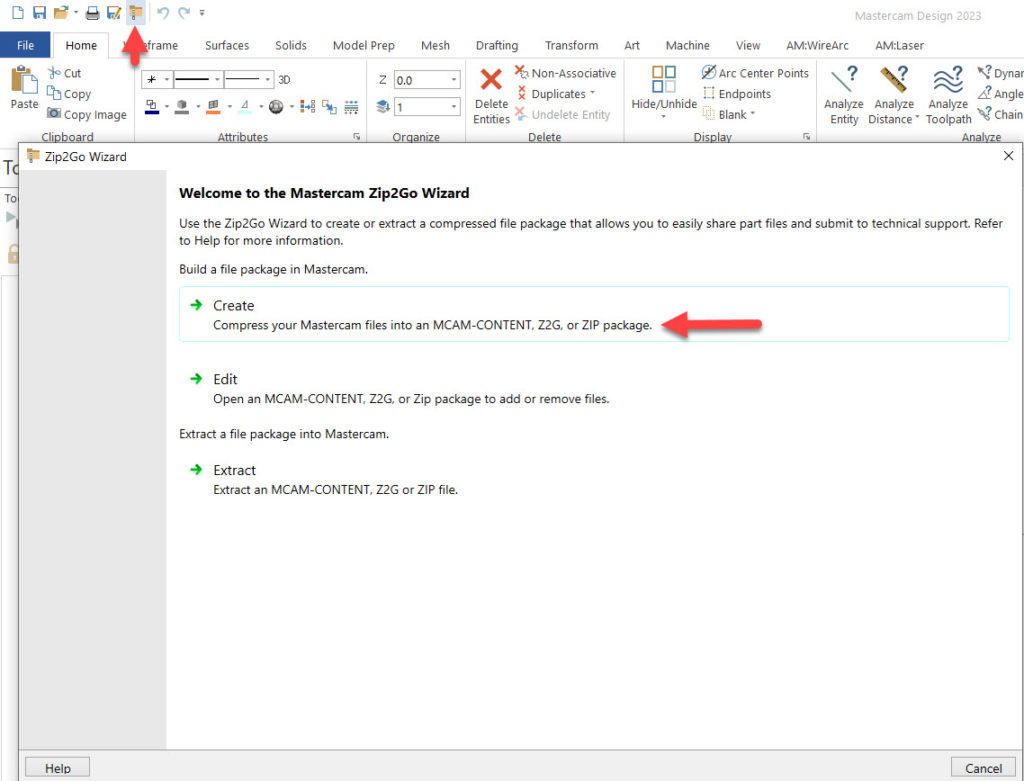
How do I create a Zip2Go file?
Zip2Go files are helpful for your resellers when it comes to tech support because a Zip2Go file (.Z2G) contains all the pertinent information regarding the file you’re working on. It sends us your machine definitions, control definition, post processor, toolpaths and more.
To create a Zip2Go – At the top of the screen in your Quick Access Ribbons click on “Zip2Go Utility”. When prompted to save your part, click yes. Once in the Zip2Go page, choose Create, put a check in the boxes for config files, post processors, and toolpath files, then click “Next/Finish”. Last prompt is to save the file.
This file will can be found in “Documents\My Mastercam 2023\Mastercam\Parts” unless you configured it otherwise.
Email the file to Mastercam@optipro.com
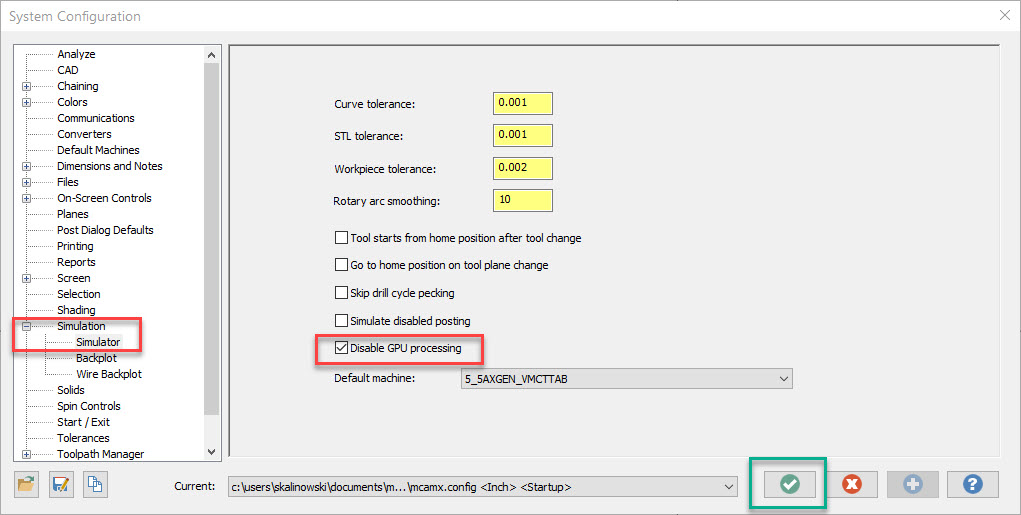
Why is my MachSim & UBVS simulation crashing?
- General crash when launching UBVS or MachSim.
- Tools appear to come in from the wrong direction in Verify.
- Parts display with gouging in 2023 Verify but not in earlier versions.
- Form tools display incorrectly in Verify.
- Arcs go the wrong way in Verify.
Mastercam 2023 introduced GPU processing which has been found to cause various issues with UBVS and MachSim simulation. Open the System Configuration from the File menu within Mastercam 2023. Navigate to Simulation – Simulator, select the Disable GPU Processing option. Click the green check and save the change.
How do I install my post processor?
When receiving post processors, they will be sent either as a mcam-content file for easy installation, or as a compressed zip file. These posts are tied together and consist of 3 to 5 files.
- If the file arrives as a compressed zip extract or copy the contents to the following locations.
- MMD= Mill
- .MMD & .Control go into:
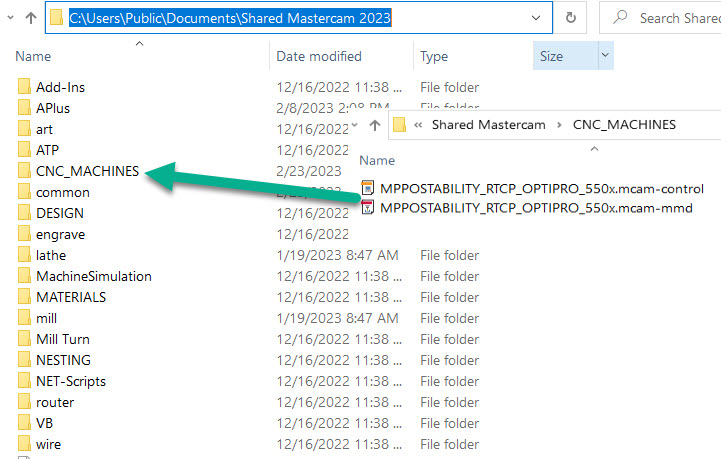
- C:\Users\Public\Documents\Shared Mastercam 2022\CNC_MACHINES
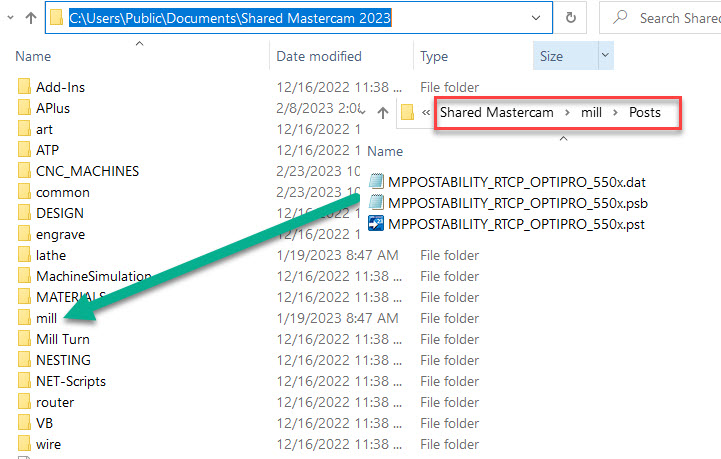
- .PSB .PST .DAT Files go into:
- C:\Users\Public\Documents\Shared Mastercam 2022\mill\Posts
- LMD= Lathe
- .LMD & .Control go into:
- C:\Users\Public\Documents\Shared Mastercam 2022\CNC_MACHINES
- .PSB .PST .DAT Files go into:
- C:\Users\Public\Documents\Shared Mastercam 2022\lathe\Posts
- RMD= Router
- .RMD & .Control go into:
- C:\Users\Public\Documents\Shared Mastercam 2022\CNC_MACHINES
- .PSB .PST .DAT Files go into:
- C:\Users\Public\Documents\Shared Mastercam 2022\router\Posts
- WMD= Wire
- .WMD & .Control go into:
- C:\Users\Public\Documents\Shared Mastercam 2022\CNC_MACHINES
- .PSB .PST .DAT Files go into:
- C:\Users\Public\Documents\Shared Mastercam 2022\wire\Posts
- .Machine= Mill Turn
- .Machine & .Control go into:
- C:\Users\Public\Documents\Shared Mastercam 2023\Mill Turn\machines
You can copy the above address and paste them into the windows explorer address bar as seen below. Doing this will bring you to the correct location.
- Once there Copy & Paste the Machine Definition and Control to the CNC Machines Folder
- Next Copy & Paste the .pst into its corresponding folder. In this example the post has a .psb & .dat file. All three go inside the Mill>Post file location
- If your Shared Mastercam folder is located on a Network location, then you will need to manually install the files like you would for a compressed zip. If you received an Mcam-content file change the file extension from mcam-content to a .zip and that will allow you to unzip the contents.
- To do this Right Click on the file, choose Properties and change the file type from .mcam-content to .zip and hit apply/ok
- This will change the file to a .zip & users can then manually go about installing the post processors.
- If the file arrives as an mcam-content, simply save it to your desktop then drag & drop it into Mastercam’s open workspace. This will automatically install the files into Mastercam’s default file location.